So 2014 is now here!
My plans for the last year didn't really go as I would have liked. I planned to have a full range of products ready to go. This didn't really happen but I still got a good handful of designs and items sketched up, worked out and finally built. But unfortunately many half finished projects.
This was one of my bad points of last year. Being fully focused on a project then I would have a brainwave of something else that I liked the thought of and I started pursuing that instead. This had me sometimes using timber from something I'd previously made already which then put that build further behind than it was.
ANYWAY!
I am now looking at the positive builds that came out of last year that are going to be part of my range of products being up for sale this year. With more to come.
The best (and admittedly most stressful) project was my 3 Tier Solid Oak Shoe Rack.
This has 40x40mm framework, 3 tier slatted shoe rack, a slatted bottom shoe box to the right hand side with my signature design lift off lid, a dovetailed drawer at the bottom, again with my signature design and slatted bottom and finally all sides paneled.
This build proudly boasts:
A size of 1350mm x 650mm x 400 (L x H x D)
64 mortise and tenon joints,
12 dovetail halving joints,
2 dovetail housing joints,
28 channels cut for the paneling to sit in
Finished in 5x coats of Danish oil and a generous coat of clear paste wax.
I chose to use slatted surfaces for everything for air circulation and didn't use one screw in the whole build.
There were a few stressful moments in this because I kind of made this up as I went along. It started life as an open sided 2 tier rack with a removable storage box at the bottom. I soon thought it is a little bit to normal for my style of work. So I added a drawer instead of a box... Then I added the box on the side... Then I decided I wanted to close off the ends and back with panels... Then I wanted to add my geometric style design to the drawer front and wanted to sink it into the framework as it closed to finish flush... I then added the same design to the lift off lid on the shoe box.
Every time I added something in it messed with something I had already fitted. But I got around it all and finally finished with the above results. It really does stop people as they pass it and they have a good look and play with the drawer.
Next!
My next idea that I stuck with from the design sketch to the end was a set of drinks coasters.
Set Of 4 Solid Oak Interlocking Geometric Drinks Coasters
These were a thought I had originally for an extra gift to include with this coffee table design of mine.
Each of the coasters have their own unique shape meaning they will only fit together one way and once locked together they made one big coaster for plates or bowls etc.
This is basically my take on the puzzle piece.
I soon found out after completing my first set that they are VERY time consuming. All edges are hand finished with a chisel to eliminate any possible large gaps which may occur if using just a bandsaw. Plus these coasters are 19mm thick and the bandsaw really doesn't like it that much!
As the time it takes to make a set of these is very high for what they are I decided to make them as a separate product. These are currently available from both my Etsy and eBay shops for around £20 (excluding postage costs).
These are the best of the bits I finished last year when I found the time in my busy day to day life to work on my own projects. As I work full time with hectic deadlines and silly overtime hours I feel I missed out on many days and hours that I could have been in my own little workshop building the things I have thought up.
I have big plans for this year.
I want to have my furniture in shops!
I'm plan to get my range up together and go and see all my local furniture shops and see if I can get myself a spot in their shops.
I also plan on having more products available in my online shops as well as scheduling in a day or two every week or so for social media updating. Meaning you will hear from me and about my projects more regularly than what I have previously updated. On my Blog, Twitter, Etsy, Facebook and my website!
Here's to the coming year!
Showing posts with label coffee tables. Show all posts
Thursday, 2 January 2014
2014 Is Here! What Of Last Year?
Labels:
chichester,
coaster,
coffee tables,
dovetail,
drink,
furniture,
geometric,
handmade,
joints,
mortice tenon,
ryon design,
shoe rack,
shoes,
social media,
solid oak,
timber,
UK,
wood,
woodwork
Thursday, 2 February 2012
Finished coffee table.
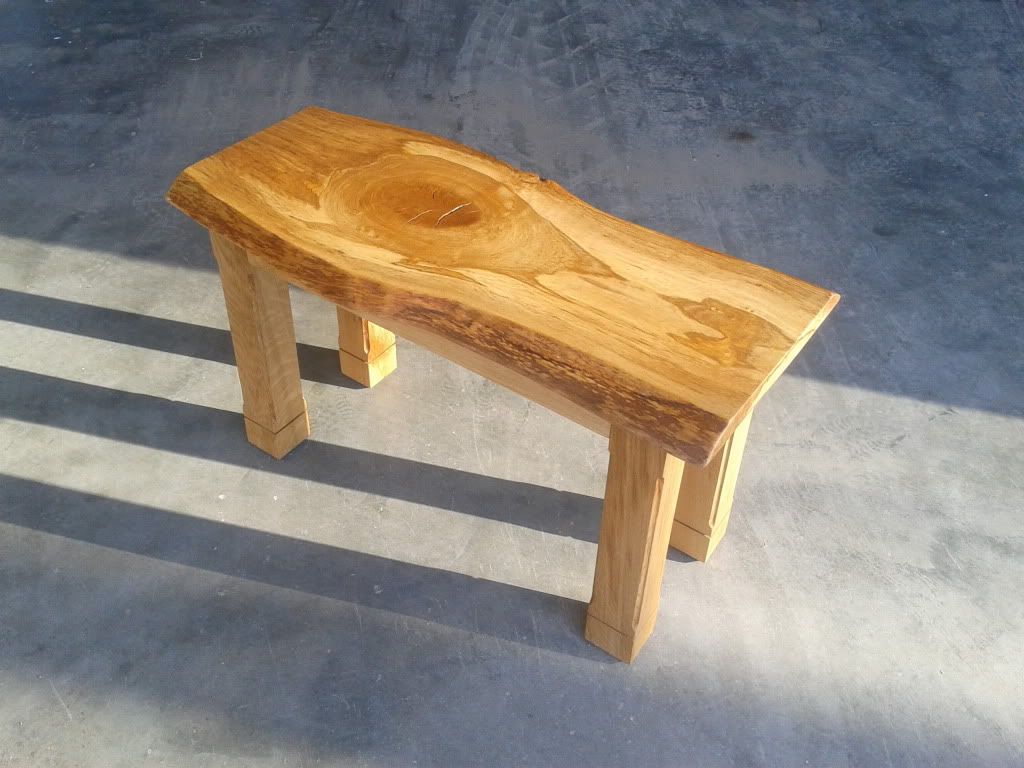
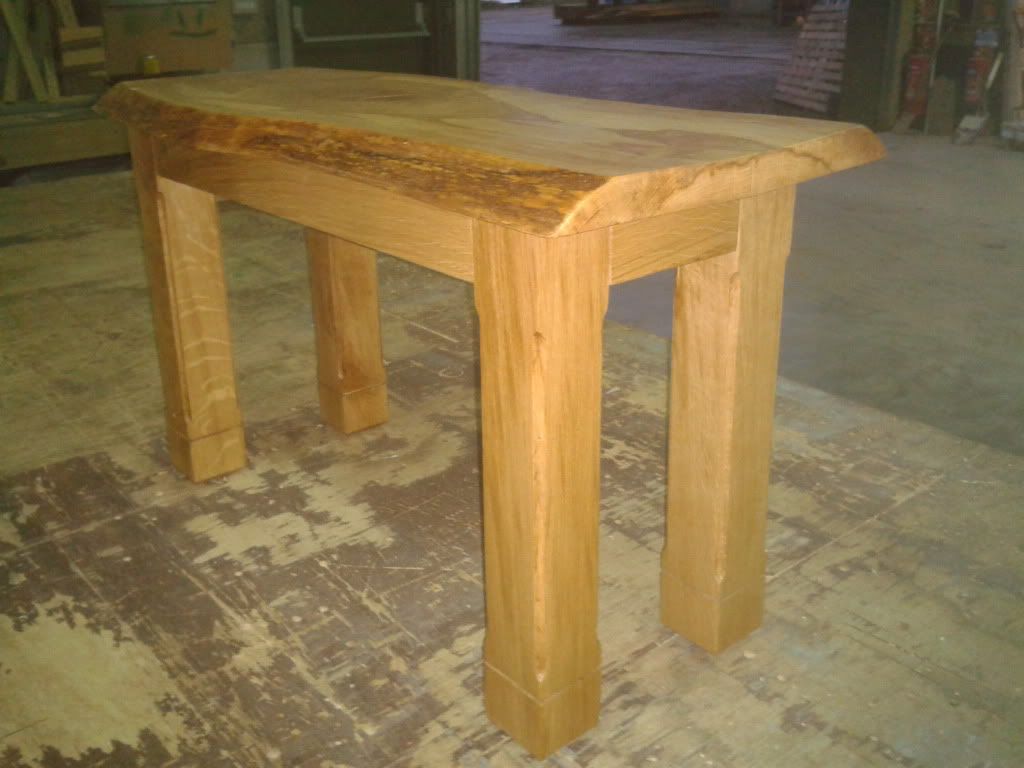
I have completed my most recent coffee table project with amazing results. A simple design with stand out features make this a coffee table that stands out in any room it will be placed. The huge knot that takes over the whole of the top is a gorgeous feature that you just cant help but admire.
You can see in the sunlight that this coffee table is very unique. You can never get these colours and patterns in the same place like this again. The large knot really makes this coffee table. But looking round this piece you will see other amazing lines and colours throughout the whole table.
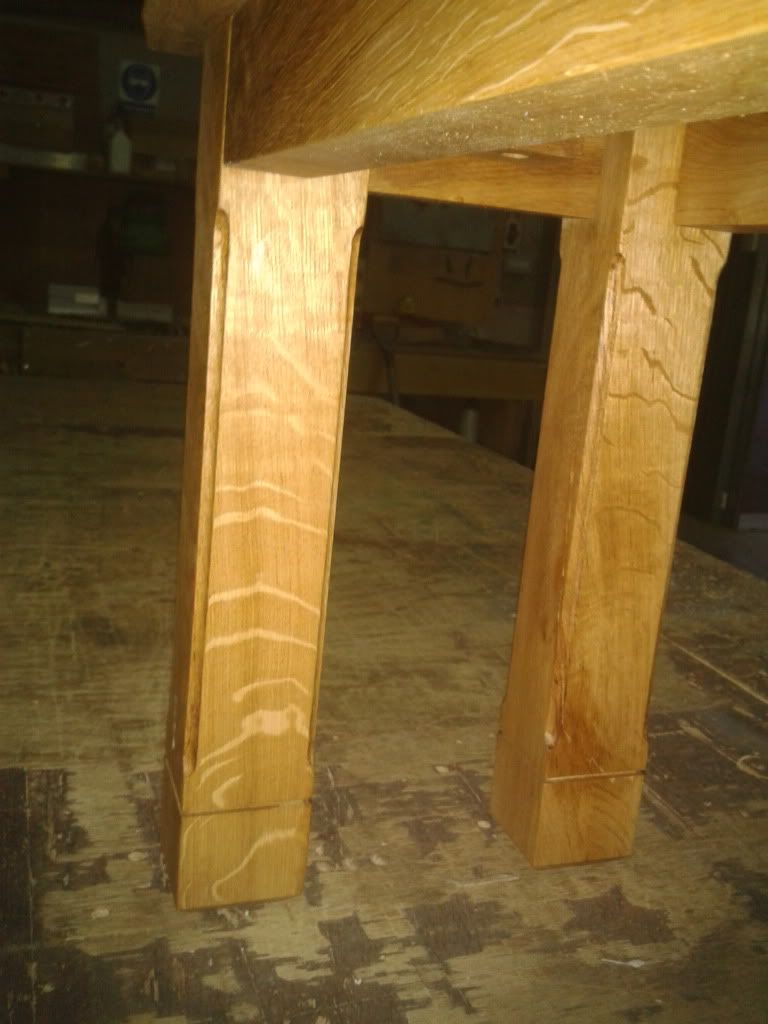
The rounded edges on the legs and angled feet give this table a simple but eye catching appearance. Hand cut mortice and tenon construction makes this a fully solid and sturdy coffee table. The gorgeous whole waney edged top is held down using screw and button method. This allows the top to naturally move without twisting the table out of square.
There are some very beautiful medullary rays (silver grain) running horizontally on the inside of the legs that just add to this tables large list of unique features.
I really enjoyed making this coffee table and I am over the moon with the end result!
Saturday, 21 January 2012
My love of Danish oil
Danish oil is my preferred finish to all my work. This is because the transformation it brings to a piece.
The images below shows what amazing features that danish oil can bring out in the oak. This waney edged coffee table top had many features to show off even before the oil was applied to it, but coupled with the oil the results were outstanding.
With the oil rubbed in with a microfibre cloth, just one coat (there will be 5 in total) transformed the piece with patterns, colours and lines that were unseen until the oil was applied. The golden colour which the oil has also gives off a warm feeling from the furniture once it is completed.
Thursday, 19 January 2012
New custom coffee table.
I have been asked to make a coffee table for a colleauge. He picked out and supplied an oak beam to use for legs and rails and a lovely waney oak board with a large knot in it which will be an amazing feature to this table.
The oak beam provided to me needed to be cut up to use for the legs and the rails. I used a table saw to machine to beam down into 4 chunks at 75mm x 75mm. I planed two faces flat and square with each other and used these edges with the table saw to cut the other sides of the timber square. I then check everything using a tri square and everything was spot on. The legs were 68mm x 68mm finished size before cutting the design into them. I used the remainder of the oak beam to cut out the rails.
I worked with my colleauge to design the table to his liking. He was certain on the design of the leg as it was his own. Plain rails was what he wanted so no detail on those. I set out marking the mortice and tenons which is the fixing method I am using for the rails to the tops of the legs.
After a lot of mallet and chisel work the mortices were chopped out and the tenons fit nice, tightly and all square. I placed the table top on the constructed legs and rails to give an idea of what the coffee table will look like when it is finished. The height was perfect and my colleauge is over the moon with it. I have some sanding left to do, glue the rails and legs together, 4 x buttons to make to fix the top to the rails and a generous 5 coats of danish oil which will bring out the beautiful lines and markings of this piece. There are many, many medullary rays in this table. Finished images are soon to follow!
Monday, 28 November 2011
Starting to bring things up together.
Over the last few months I have been trying to create my own basic logo and branding, so I can start building a visual name for my business to get the ball rolling.
As at this moment in time I am in full time employment which doesn't leave me much time in the day to work on my projects as well as use the internet to get traffic to my pages. I try cram as much into the day as I can. I am in the process of making and finishing four projects and I try to work on two of them each day. Maybe concentrating on one at a time will help get them finished and in my etsy shop.
Finishing more pieces will fill my shop that I can start getting potential customers to visit and see my work! Promoting my full shop rather than individual products will be easier I hope.
I think this blog needs a facelift as well and more people coming to it as I don't promote this as much as I should.
So the ball is starting to roll ... slowly. But this is just the start!
Monday, 7 November 2011
Etsy Shop now open!
My unique handmade solid oak furniture is now available to buy direct from Etsy.
My shop is http://ryondesign.etsy.com
Check back often to find new items for sale.
My shop is http://ryondesign.etsy.com
Check back often to find new items for sale.
Labels:
chichester,
coffee tables,
crafted,
design,
different,
etsy,
facebook,
furniture,
handmade,
o'neill,
oak,
ryan,
ryon design,
sale,
shop,
tables,
twitter,
unique,
woodwook
Social networks!
I best add my information of my presence on social networks.
Facebook - Ryon Design
Twitter - @RyonDesign
Like/Follow me to see items currently in production and all my plans and ideas. Get your name down before anyone else for something you like before it goes up for sale!
Facebook - Ryon Design
Twitter - @RyonDesign
Like/Follow me to see items currently in production and all my plans and ideas. Get your name down before anyone else for something you like before it goes up for sale!
Tuesday, 5 July 2011
Mallet!
I have been looking for a while now at getting a nice wooden mallet for fine chisel work instead of using a heavy hammer. While on my search for a decent mallet it seemed that all I found was either way to over priced for what it was or very cheap and tacky which and would fall apart after a few projects.
So I decided to make my own! That way I could make it to what I wanted it to do and what I wanted it to look like. I had a rummage around it my stack of small oak off cuts and found a nice chunk of kiln dried 4x2 and a perfect piece for a handle.
I started by cutting the head to size and giving it a 5 degree angle on each end. I took the handle piece and a plane and started to taper it gradually testing the grip until I was happy with the thickness. Next came the measuring and marking out as the idea was to make a mortice right through following the exact sizes of the handle and ensure a perfectly tight fit. I marked the center of the head, top and bottom and sent a 4mm pilot drill through the make sure the hole was straight before sending a flat wood bit through to remove most of the waste.
Next job was to clamp down to head and begin the chisel work to remove the rest of the waste wood and to form the tapered mortice. Once I got to the inside edges of my marking lines I began testing the fit regularly to keep on top of the perfect fit I was after. It wasn't long before I was happy with the fit.
I grabbed a bottle of wood glue and a rubber mallet and placed to head in a vice and roughly worked out where the glue would need to be placed on the handle to sit inside the head. I applied the glue to both pieces and started to tap the handle down from the top until it wedged firmly inside the head piece. The fit was perfect and didn't really need and glue but it is in there anyway for added support.
Waited a few hours for the glue to set before taking some sandpaper to it and taking off all the edges and corners. A nice small coat of Danish oil to bring out the grain and a small amount of wax after it dried finished it off nicely.
This is the finished mallet :
I am very happy with the result, the weight is just right and it looks a hell of a lot nicer than everything else I was looking at. After a few weeks of use it is still perfect. Still looks brand new and still solid.
It was an easy tool to make which I urge people to try making themselves instead of purchasing those on sale at the moment. Don't get me wrong, I'm sure many on sale are fine and perfect for the job its meant for just in my mind they just didn't work for my personal tastes. So why not try making one!? A basic tool kit and knowledge is all that's needed. Plus it will surely add to the satisfaction of using a tool you made yourself to complete a project!!
Labels:
chichester,
coffee,
coffee tables,
crafted,
danish oil,
DIY,
furniture,
handmade,
how to,
mallet,
o'neill,
oak,
ryan,
ryon design,
solid,
tables,
tools,
wax,
woodwook
Sunday, 5 June 2011
I am starting to design a few more pieces to build.
I have been drawing up a few designs lately for items such as a chest of drawers, bedside cabinets, and bed frames. I am considering making a whole set with the same design for a whole basic bedroom set.
The design I am considering is going to take a lot of time. Every face of every section will be detailed heavily to create a complex piece of furniture that will be amazing to just sit and look at.
This is going to take a long time!
The design I am considering is going to take a lot of time. Every face of every section will be detailed heavily to create a complex piece of furniture that will be amazing to just sit and look at.
This is going to take a long time!
Labels:
bedroom,
bedside,
cabinets,
chest of drawers,
chichester,
coffee,
coffee tables,
crafted,
design,
furniture,
handmade,
interior,
o'neill,
oak,
ryan,
ryon,
ryon design,
woodwook
Friday, 3 June 2011
My blog is now my website.
I am now using this blog for my website until I get a full website created to use. www.ryondesign.co.uk will now bring you here!
Thank you for visiting.
A website is beginning to be thought about right now.
Thank you for visiting.
A website is beginning to be thought about right now.
Saturday, 28 May 2011
Using green wood issues.
The first 2 coffee tables I made were made using green oak off cuts. I cut them to size and left them to dry out more before I used them but I couldn't wait that long. I just wanted to build something I designed! But now I can see the issues that have developed which will now have to be sorted out. I spent a lot of time squaring every edge to sit perfectly to each other on the top so minimal joint lines were visible. When I finished the table everything was perfect. But now after 3 months of being in a room temp environment the heat has taken its toll on the water in the Oak that was still there when I made it. It caused everything to shrink which caused all the joints to open up as you can see from this picture.
I have from this table learned that only seasoned wood will need to be used to make something that will not move in a room. The listed at least 12% MC (moisture content) in wood to be used for interior furniture construction is there for a reason. What happened here with the top shrinking is only 1 of many things that can happen from using green (wet) timber.
I have learned not to use green oak for my work even though I have a regular free off cuts supply
of this ( A friend of mine has an oak framing business). I am keeping hold of the bits I can use still but storing them to dry them out after cutting them to approximate size so I could possibly use them in the coming years. Remembering the rule of thumb. Every half inch thickness should be left to dry for a year.
Labels:
12%,
chichester,
coffee tables,
content,
crafted,
dry,
furniture,
green,
handmade,
interior,
issues,
MC,
moisture,
oak,
seasoned,
wet
Friday, 27 May 2011
A little light reading.
I have been researching and learning at the same time as perfecting my joints in my work. I have been flicking through a great book called Wood Work The complete step-by-step manual. This book shows everything you will ever need. It has very clear images and everything is worded so you instantly understand. From how to sharpen hand tools to building a huge welsh dresser step-by-step.
A great book in my opinion!!
Sunday, 22 May 2011
Starting it all up.
So... I have finally started to pull my finger out and push forward on my business. Around Christmas time (2010) I began thinking I wanted to make something of myself instead of just having a job that pays the bills. At 27 years old I must admit it has taken a lot longer to come to this point than it should have. I knew that I wanted to create something different using skills that I have developed over the years in the woodworking industry building timber buildings.
I got myself a pad of paper and a pencil and set about designing some furniture. I started with a coffee table that I needed in my living room as the one I had was to big for the space I had. I drew up a few designs and came up with one that me and my partner were happy with. I had the good fortune of having a vast array of tools and machines at my place of work which I could use and a large stack of green oak off cuts that were stacked up ready for being burnt. I swiftly saved all of the wood and set about machining the oak to the sizes I needed.
I knew straight away it was oak that I wanted to work with. I have been involved in many oak framed buildings in my place of work which I really enjoyed doing so oak in my mind was the timber I wanted to build with.
Ever since I started on this first coffee table project I have been amazed at how much I enjoyed doing it. I am not trained as a fine furniture maker but I do have a massive attention to detail that I am committed to uphold. I'm researching and learning through books, magazines and the internet in which I have learned a lot. A big chunk of the information I already knew being in the industry but I am learning and improving on my skills every time I make a new piece.
It has now been 5 months since I started making furniture which have all been coffee tables at the moment which I have been building on the part time basis as I still have my full time job. As of today I have 4 very unique designs that are strong, solid, interesting and different. Very different to anything out there at the moment and I have had a lot of positive feedback.
This weekend has been time for me to get myself a blog and a website domain to get my furniture on show.
This is where I am at the moment. I have many designs drafted up which I am excited about making a start on. I hope to get a handful of coffee tables, a few bed frames and a selection a garden furniture made in the coming weeks/ months all from solid oak.
Subscribe to:
Posts (Atom)